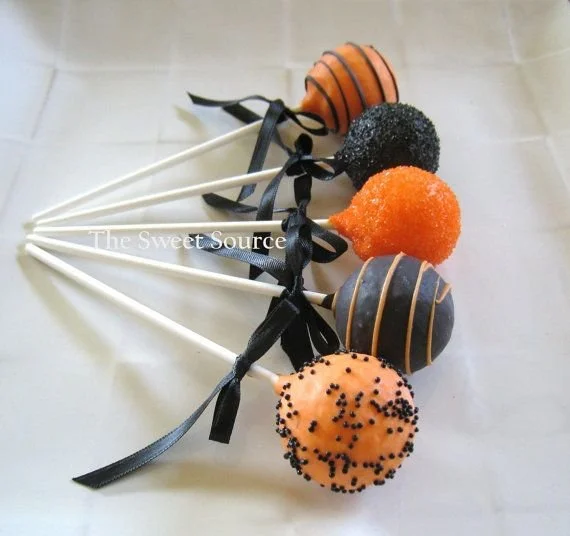
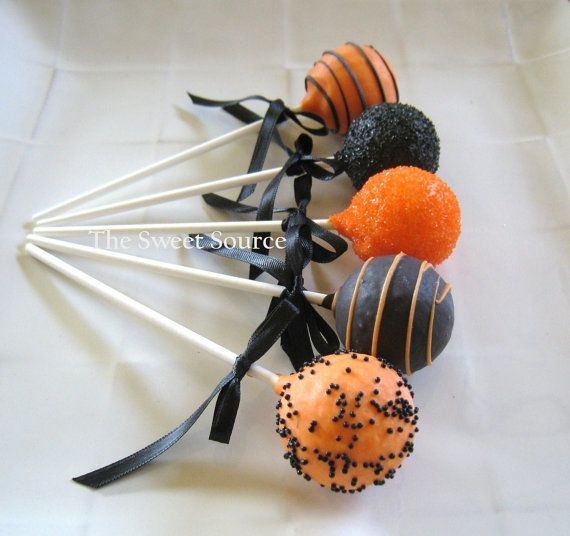
Making your own Orange and Red Cake Pops at home is a delightful way to add a splash of color and flavor to any celebration. These treats are not only visually stunning but also simple to make, making them perfect for family gatherings, birthday parties, or just a fun weekend activity. With their vibrant appearance and sweet, tangy flavor, these cake pops will be the star of your dessert table.
Why You’ll Love Orange and Red Cake Pops
- Visually Appealing: The bright orange and red colors create an eye-catching dessert that’s perfect for festive occasions.
- Customizable: You can easily adjust the flavors and colors to suit your theme or preference, making them versatile for any event.
- Kid-Friendly: These cake pops are fun to make and eat, making them a hit with both kids and adults alike.
- Easy to Make: With simple ingredients and straightforward instructions, you can whip these up in no time, even if you’re a beginner in the kitchen.
- Perfect for Parties: These cake pops are great for sharing and make a wonderful addition to dessert tables or party favors.
Recipe Overview
- Prep Time: 25 minutes
- Cook Time: 30 minutes
- Total Time: 55 minutes
- Servings: 24 cake pops
- Difficulty Level: Easy
Ingredients You’ll Need for Orange and Red Cake Pops
-
For the Cake:
- 1 box of orange-flavored cake mix
- 3 large eggs (helps bind the cake)
- 1 cup of water
- 1/3 cup of vegetable oil (adds moisture)
-
For the Frosting:
- 1 cup of orange frosting (you can use store-bought or homemade)
- Additional frosting for coating
-
For the Coating and Decoration:
- 12 ounces of red candy melts (for dipping)
- 12 ounces of orange candy melts (for decorating)
- Lollipop sticks
- Sprinkles or edible glitter (optional)
How to Make Orange and Red Cake Pops
-
Bake the Cake
- Preheat your oven to 350°F (175°C). Prepare a 9×13 inch cake pan according to the package instructions for the cake mix.
-
Mix Ingredients
- In a large mixing bowl, combine the cake mix, eggs, water, and vegetable oil. Mix until well combined and pour the batter into the prepared cake pan.
-
Bake and Cool
- Bake as per the package instructions, usually around 30 minutes, or until a toothpick inserted in the center comes out clean. Allow to cool completely.
-
Crumble the Cake
- Once cooled, crumble the cake into a large bowl using your hands or a fork until you have fine crumbs.
-
Add Frosting
- Add 1 cup of orange frosting to the cake crumbs and mix until well combined. The mixture should be moist and hold together when pressed.
-
Form Cake Balls
- Scoop out about 1 tablespoon of the mixture and roll it into a ball. Repeat until all the mixture is used, placing the balls on a baking sheet lined with parchment paper.
-
Prepare for Dipping
- Insert lollipop sticks into the center of each cake ball. Place the baking sheet in the refrigerator for about 15-20 minutes to set.
-
Melt the Candy Coating
- While the cake balls are chilling, melt the red candy melts according to package instructions in a microwave or double boiler until smooth.
-
Dip the Cake Pops
- Dip each cake pop into the melted red candy, coating it completely. Allow excess to drip off and return to the parchment-lined baking sheet.
-
Decorate
- Once the red coating is set, use melted orange candy melts to drizzle over the pops for decoration. Sprinkle with edible glitter or sprinkles if desired.
-
Final Chill
- Let the pops sit at room temperature or in the refrigerator until completely set.
Tips for Success
- Chill Thoroughly: Refrigerating the cake balls before dipping helps them maintain their shape.
- Use Festive Colors: Feel free to use different colors of candy melts to match your event’s theme.
- Avoid Overburning: Melt the candy melts in short intervals to prevent burning; stir in between melts.
- Check Consistency: If your cake pop mixture is too dry, add a bit more frosting; if too wet, add more cake crumbles.
- Keep Sticks Steady: Dip the sticks in the candy melts before inserting them in the cake balls for better adherence.
Easy Variations
- Chocolate Version: Use chocolate cake mix and chocolate frosting for a rich flavor twist.
- Nutty Add-In: Add chopped nuts or chocolate chips to the cake mixture for added texture.
- Alternative Coatings: Instead of candy melts, use white chocolate and color it with food dye for a different look.
- Fruit-Flavored Cake Pops: Substitute the orange cake mix with lemon or strawberry for refreshing variations.
- Animal Themes: Use sprinkles in the shape of animals or other fun themes for kids’ parties.
What to Serve with Orange and Red Cake Pops
- Fruit Salad: A light fruit salad complements the sweetness of the cake pops and offers a refreshing contrast.
- Ice Cream Sundaes: Pair these cake pops with a scoop of vanilla ice cream for an indulgent treat.
- Chocolate Brownies: The rich flavor of brownies balances out the sweetness of the cake pops nicely.
- Milk: A glass of cold milk makes the perfect drink pairing to soften the richness of the cake pops.
- Coffee: A cup of coffee adds a delightful bitter note that contrasts beautifully with the sweet flavors.
Storage and Reheating
- Refrigerator Storage: Cake pops can be stored in an airtight container in the refrigerator for up to 1 week.
- Freezer Storage: For longer storage, freeze the cake pops on a baking sheet until solid, then transfer to an airtight container for up to 3 months.
- Reheating: No need to reheat; enjoy cold or at room temperature to maintain their texture.
- Preserve Texture: To keep the pops fresh, avoid stacking them directly on top of each other.
Common Mistakes to Avoid
- Not Chilling the Cake Balls: Failing to chill the cake balls can cause them to fall apart during dipping.
- Skipping the Sticks: Not dipping the sticks in melted candy before inserting them can lead to them falling out.
- Using Too Much Frosting: Overloading the mixture with frosting can make the pops too moist, affecting the structure.
- Rushing the Coating: Dipping warm cake pops into the coating can lead to a messy finish. Ensure they are cool.
- Ignoring Measurements: Use a consistent scoop size for uniform cake pops, which ensures even baking and dipping.
Orange and Red Cake Pops: Background & Cultural Inspiration
Cake pops originated from the innovative way of repurposing leftover cake in the United States. They became popular due to their neat, bite-sized form, making them a favored treat at parties and celebrations. The vibrant orange and red color scheme of these cake pops draws from customary seasonal themes, particularly around autumn festivities and Halloween. The bright colors also symbolize joy and celebration, making them a fitting treat for various social gatherings and events.
Frequently Asked Questions
Can I use homemade cake?
Yes, you can absolutely use homemade cake for these cake pops; just ensure it is completely cooled before crumbling.
How long do cake pops last?
Cake pops can last up to one week in the refrigerator and can be frozen for up to three months.
Can I omit the frosting?
While you can reduce the amount, the frosting is crucial for binding the cake together. Consider using less if desired.
How can I make these gluten-free?
You can use gluten-free cake mix instead and ensure that all other ingredients are also gluten-free.
Can I make these ahead of time?
Yes, cake pops can be made a few days in advance. Just store them properly to keep them fresh.
Final Thoughts
Orange and Red Cake Pops are not only fun to make but also add a festive touch to any gathering. With their cheerful colors and delicious flavor, they’re bound to become a favorite treat among both kids and adults. So gather your ingredients, get creative, and enjoy making these delightful treats! Happy baking!
PrintOrange and Red Cake Pops
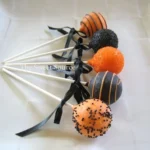
Delightful and visually stunning orange and red cake pops perfect for any celebration.
- Prep Time: 25 minutes
- Cook Time: 30 minutes
- Total Time: 55 minutes
- Yield: 24 cake pops
- Category: Dessert
- Method: Baking
- Cuisine: American
- Diet: Vegetarian
Ingredients
- 1 box of orange-flavored cake mix
- 3 large eggs
- 1 cup of water
- 1/3 cup of vegetable oil
- 1 cup of orange frosting
- 12 ounces of red candy melts
- 12 ounces of orange candy melts
- Lollipop sticks
- Sprinkles or edible glitter (optional)
Instructions
- Preheat your oven to 350°F (175°C). Prepare a 9×13 inch cake pan according to the package instructions.
- Combine the cake mix, eggs, water, and vegetable oil in a large mixing bowl and mix well.
- Bake according to package instructions, usually around 30 minutes, or until a toothpick comes out clean. Let it cool completely.
- Crumble the cooled cake into fine crumbs in a large bowl.
- Add 1 cup of orange frosting to the crumbs and mix until well combined.
- Scoop out about 1 tablespoon of the mixture and roll into a ball. Repeat until all mixture is used.
- Insert lollipop sticks into the center of each cake ball and refrigerate for 15-20 minutes.
- Melt the red candy melts according to package instructions until smooth.
- Dip each cake pop in melted red candy, then place on a parchment-lined baking sheet.
- Drizzle melted orange candy over the pops for decoration and sprinkle with edible glitter.
- Let the pops sit until completely set.
Notes
Chill thoroughly before dipping for best results. Customizable colors and flavors available.